
TL;DR: Maestro’s native reporting is bare-bones. We built maestro-complete-reports to add HTML reports, JUnit XML, Allure support, and screenshots. One install, then run your tests as usual.
The Problem
You’ve set up Maestro. Your tests pass. Now you need to:
- Show results to stakeholders (HTML report)
- Wire it into Jenkins/GitHub Actions (JUnit XML)
- Track trends over time (Allure)
- See what failed (screenshots)
You check Maestro’s docs. The output options are… limited.
If you’re running Maestro locally, the console output works. But the moment you need CI/CD integration or reports for non-engineers, you’re stuck writing custom parsers or stitching together scripts. For CI/CD setup, see Maestro CI/CD: GitHub Actions & Jenkins.
Does Maestro Support JUnit XML Reports?
Not natively. As of December 2025, Maestro’s built-in reporting gives you:
| Format | Native Support | CI/CD Ready |
|---|---|---|
| Console output | Yes | No |
| JSON summary | Basic | Manual parsing needed |
| JUnit XML | No | — |
| HTML report | No | — |
| Allure | No | — |
| Screenshots on failure | No | — |
Every major CI system speaks JUnit XML. Without it, you lose:
- Test result visualization in GitHub Actions / GitLab / Jenkins
- Historical pass/fail tracking
- Flaky test detection
The Solution: maestro-complete-reports
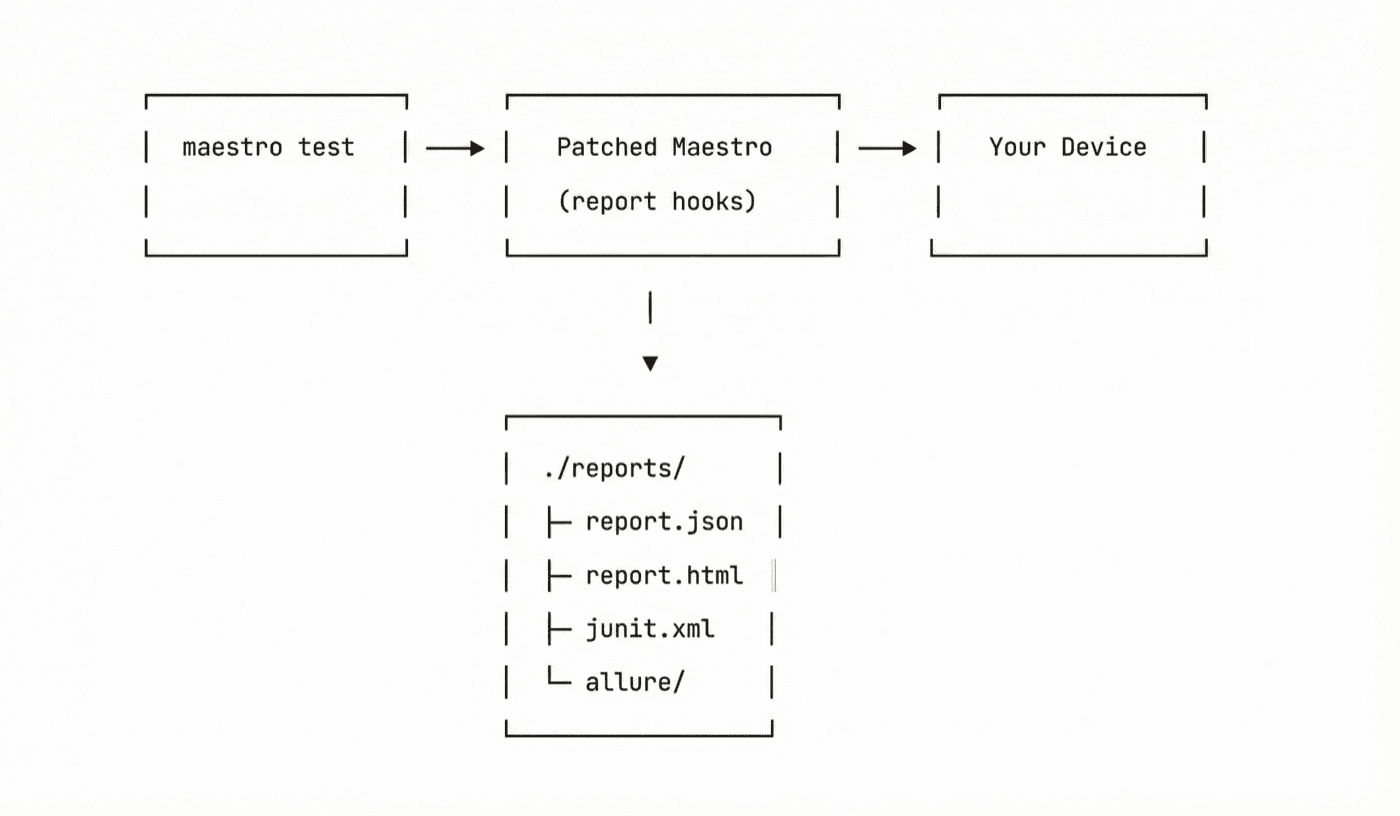
We patched Maestro to generate complete reports.
What you get:
| Format | Description |
|---|---|
| JSON | Full test data for programmatic analysis |
| HTML | Interactive web report for stakeholders |
| JUnit XML | Plug-and-play CI/CD integration |
| Allure | Trend analysis and historical comparison |
| Screenshots | Automatic capture linked to failures |
What changes:
- Your test flows stay the same
- Your CI commands stay the same
- Just add
--report-dirto get reports
Quick Start
1. Install (one command):
curl -fsSL https://open.devicelab.dev/install/maestro-reports.sh | bash
This backs up your original Maestro JARs and installs patched versions.
2. Run your tests:
maestro test flows/ --report-dir ./reports
3. Check your reports:
./reports/
├── report.json
├── report.html
├── junit-report.xml
└── allure-results/
That’s it. Your existing flows work unchanged.
Test Suite Organization
We added suite and test commands for logical grouping:
# login-tests.yaml
appId: com.example.app
---
- suite: "Login"
- test: "Should login with valid credentials"
- launchApp
- tapOn: "Email"
- inputText: "[email protected]"
- tapOn: "Password"
- inputText: "correct-password"
- tapOn: "Login"
- assertVisible: "Welcome"

- test: "Should show error for invalid password"
- launchApp
- tapOn: "Email"
- inputText: "[email protected]"
- tapOn: "Password"
- inputText: "wrong-password"
- tapOn: "Login"
- assertVisible: "Invalid credentials"
Console output shows the hierarchy with pass/fail status:
===== Test Summary =====

✅ Invalid Login
   ✅ Should show error for invalid password
   ✅ Should show error for invalid username

❌ Valid Login
   ✅ Should login with alternate credentials
   ❌ Should login with wrong password
   ✅ Should login with primary credentials

========================
Suites: 1 passed, 1 failed
Tests:  4 passed, 1 failed
Green checkmarks for passed, red X for failed. At a glance, you know exactly what broke.
Sample Output
Console
==========================================================================================
  Flow                                   Status  Steps   Pass   Fail   Skip   Duration
------------------------------------------------------------------------------------------
  Login - Valid Credentials                   ✓     13     13      0      0      22.0s
  Login - Invalid Password                    ✓     10     10      0      0      23.0s
  Login - Invalid Username                    ✓     10     10      0      0      22.0s
  Checkout - Add to Cart                      ✕     15     12      3      0      30.0s
------------------------------------------------------------------------------------------
  Total                                             48     45      3      0      1m 37s
==========================================================================================
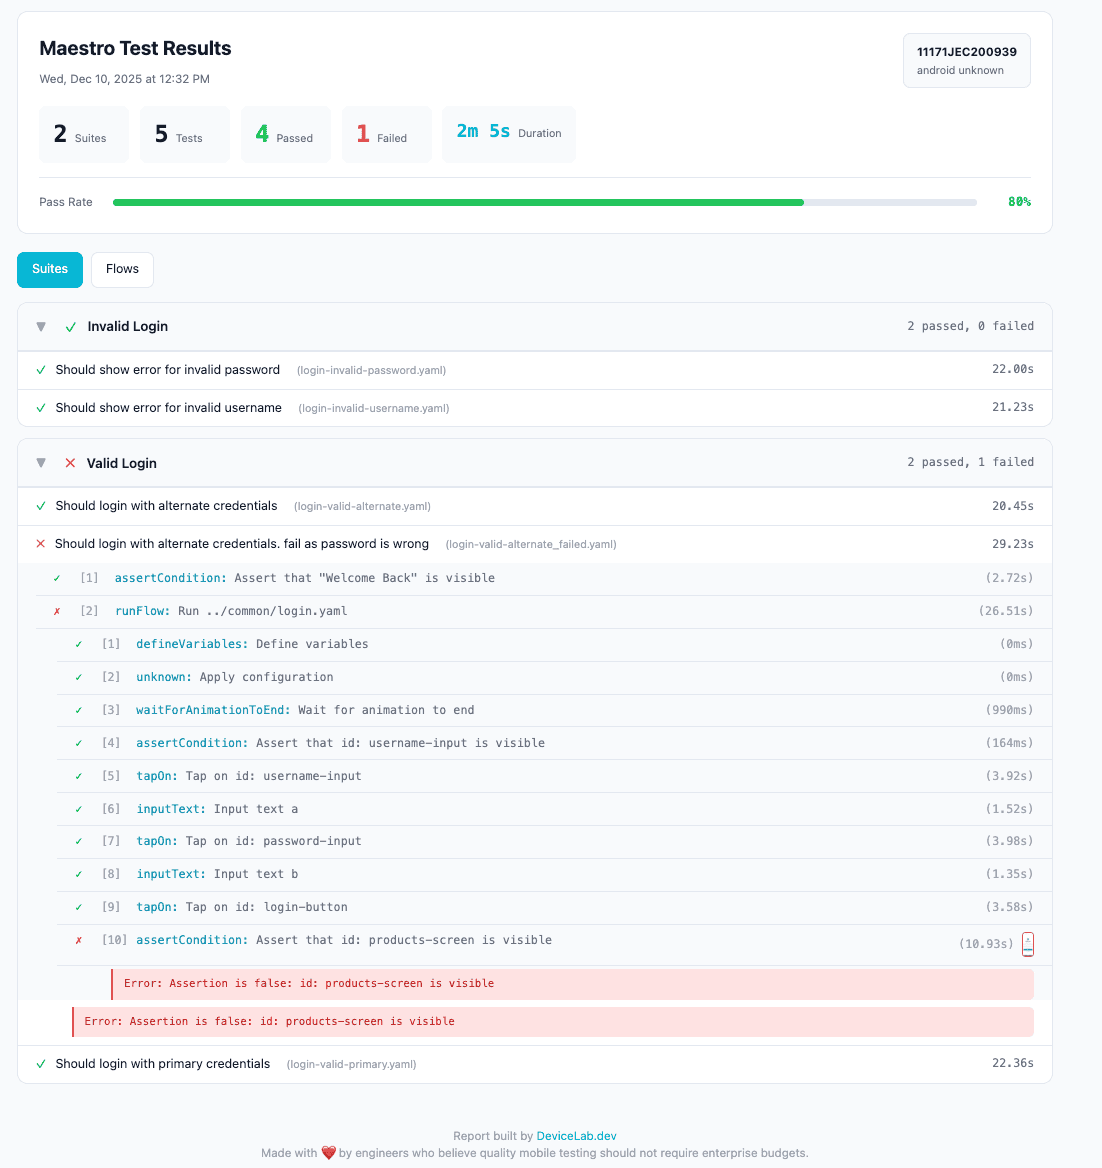
HTML Report
Share this with stakeholders. No terminal access needed.
JUnit XML
<?xml version="1.0" encoding="UTF-8"?>
<testsuites tests="5" failures="1" time="120.0">
  <testsuite name="Login" tests="3" failures="0" time="67.0">
    <testcase name="Should login with valid credentials" time="22.0"/>
    <testcase name="Should show error for invalid password" time="23.0"/>
    <testcase name="Should show error for invalid username" time="22.0"/>
  </testsuite>
  <testsuite name="Checkout" tests="2" failures="1" time="53.0">
    <testcase name="Should add item to cart" time="23.0"/>
    <testcase name="Should complete purchase" time="30.0">
      <failure message="Element 'Confirm' not found">
        assertVisible failed: Could not find element
      </failure>
    </testcase>
  </testsuite>
</testsuites>
This plugs directly into Jenkins, GitHub Actions, GitLab — any CI that speaks JUnit.
How It Works
We patched Maestro’s core JARs to intercept test execution events and generate reports.
Your original JARs are backed up to ~/.maestro/backup/. One command restores them.
Compatibility
| Maestro Version | Status |
|---|---|
| 2.0.10 | Tested |
| 2.0.9 | Tested |
| Older versions | Not supported |
Restoring Original Maestro
Changed your mind? Restore with:
cp ~/.maestro/backup/*.jar ~/.maestro/lib/
CI/CD Integration
GitHub Actions
name: Mobile Tests
on: [push]

jobs:
  test:
    runs-on: macos-latest
    steps:
      - uses: actions/checkout@v4

      - name: Install Maestro + Reports
        run: |
          curl -fsSL https://get.maestro.mobile.dev | bash
          curl -fsSL https://open.devicelab.dev/install/maestro-reports.sh | bash

      - name: Run tests
        run: maestro test flows/ --report-dir ./reports

      - name: Upload results
        uses: actions/upload-artifact@v4
        with:
          name: test-reports
          path: ./reports/

      - name: Publish JUnit results
        uses: mikepenz/action-junit-report@v4
        if: always()
        with:
          report_paths: './reports/junit-report.xml'
Jenkins
pipeline {
    agent any
    stages {
        stage('Test') {
            steps {
                sh 'maestro test flows/ --report-dir ./reports'
            }
            post {
                always {
                    junit 'reports/junit-report.xml'
                    archiveArtifacts artifacts: 'reports/**/*'
                }
            }
        }
    }
}
GitLab CI
test:
  script:
    - maestro test flows/ --report-dir ./reports
  artifacts:
    when: always
    paths:
      - reports/
    reports:
      junit: reports/junit-report.xml
FAQ
Is this official Maestro?
No. This is a community patch. Not affiliated with mobile.dev. When Maestro adds native reporting, we recommend switching.
Will it break my existing tests?
No. Your YAML flows run exactly the same. The only difference is what gets written to --report-dir.
Do I need to change my CI pipeline?
Just add --report-dir ./reports to your maestro test command. Everything else stays the same.
Why patch JARs instead of a wrapper script?
A wrapper can only see what Maestro outputs. Patching lets us hook into test execution events, capture screenshots at the right moment, and structure results properly.
What about Maestro Cloud?
Maestro Cloud (Robin) has its own reporting. This tool is for teams running Maestro locally or on their own CI infrastructure. For a full comparison with Appium, see Maestro vs Appium 2025.
Links
- Tool: github.com/devicelab-dev/maestro-complete-reports
- CI/CD Examples: docs/ci-cd.md
- Test Suite Guide: docs/test-suites.md
Built by DeviceLab — run tests on your own devices, get reports that actually work.