
Maestro Cloud charges $250/device/month. BrowserStack’s App Automate starts at $199/month. Here’s how to run Maestro tests in CI without paying either.
Maestro is open-source. The CLI is free. The test framework is free. The only thing that costs money is where you run your tests.
Whether you’re migrating from BrowserStack’s Maestro integration, evaluating Maestro Cloud pricing, or setting up mobile E2E testing from scratch, this guide covers every option.
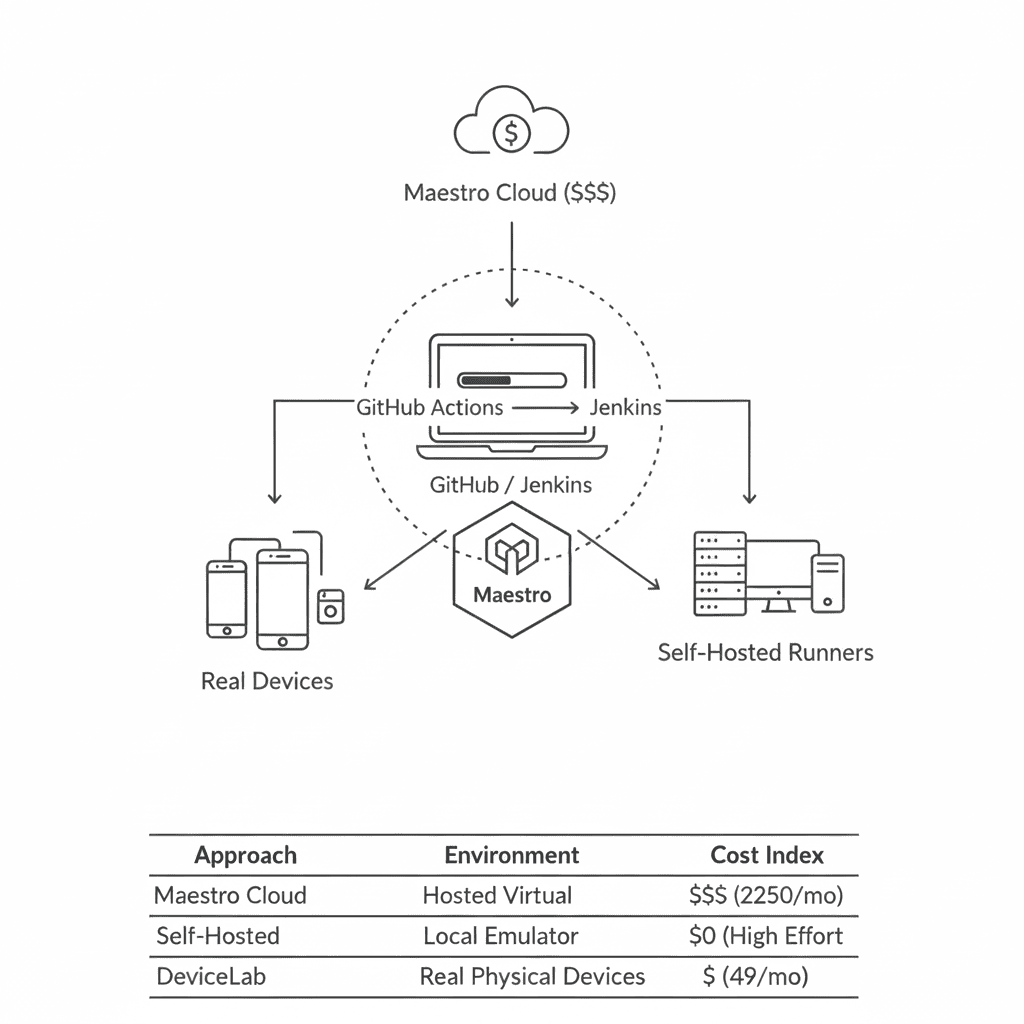
This guide covers three approaches:
- GitHub Actions with Maestro Cloud — The official path (costs money)
- GitHub Actions self-hosted — Your own runners (free, but you manage infra)
- Jenkins with local devices — Full control (free, most setup)
And at the end: a fourth option that gives you the simplicity of cloud with the economics of self-hosted.
The Cloud Options: What They Cost
Before we get into the DIY setups, here’s what you’d pay for managed solutions:
| Service | Android | iOS | Notes |
|---|---|---|---|
| Maestro Cloud | $250/device/month | $250/device/month | Per concurrent execution |
| BrowserStack App Automate | $199-249/month | $199-249/month | 1 parallel included, runs Maestro 1.39 |
| DeviceCloud (Moropo) | ~50% of Maestro Cloud | Same | Uses open-source Maestro API |
If you need 3 parallel iOS devices and 3 Android devices, Maestro Cloud costs $1,500/month.
That’s the motivation for self-hosting.
Option 1: GitHub Actions + Maestro Cloud
This is the path of least resistance. You pay for simplicity.
Setup
- Get your API key from console.maestro.dev
- Add it as a GitHub secret:
MAESTRO_CLOUD_API_KEY - Add the action to your workflow:
# .github/workflows/maestro.yaml
name: Maestro Tests

on:
  push:
    branches: [main]
  pull_request:
    branches: [main]

jobs:
  test:
    runs-on: ubuntu-latest
    steps:
      - uses: actions/checkout@v4

      - uses: actions/setup-java@v4
        with:
          distribution: 'temurin'
          java-version: '17'

      - run: ./gradlew assembleDebug

      - uses: mobile-dev-inc/action-maestro-cloud@v1.9.8
        with:
          api-key: ${{ secrets.MAESTRO_CLOUD_API_KEY }}
          project-id: 'proj_01example'
          app-file: app/build/outputs/apk/debug/app-debug.apk
That’s it. Your app and flows upload to Maestro Cloud, tests run on their infrastructure, and results appear in your PR.
What You Get
- No emulator/simulator management
- Parallel execution included
- Video recordings, logs, screenshots
- SOC 2 compliance (if that matters to you)
What You Pay
$250/device/month. Three parallels = $750/month = $9,000/year.
Option 2: GitHub Actions Self-Hosted Runners
Run Maestro on your own hardware. Zero cloud costs, but you manage the infrastructure.
The Challenge
GitHub’s hosted runners have limitations:
- Linux runners can run Android emulators, but without hardware acceleration (slow)
- macOS runners work for iOS simulators, but cost 10x the Linux rate
- Neither has physical devices
The solution: self-hosted runners on machines you control.
Android on Linux (with KVM)
For Android, you need a Linux machine with KVM virtualization enabled. This rules out most cloud VMs, but works on bare metal or dedicated hosts.
# .github/workflows/maestro-android.yaml
name: Maestro Android (Self-Hosted)

on: [push, pull_request]

jobs:
  test:
    runs-on: self-hosted  # Your own machine with KVM
    steps:
      - uses: actions/checkout@v4

      - uses: actions/setup-java@v4
        with:
          distribution: 'zulu'
          java-version: '17'

      - name: Install Maestro
        run: |
          curl -Ls "https://get.maestro.mobile.dev" | bash
          echo "$HOME/.maestro/bin" >> $GITHUB_PATH

      - name: Start Android Emulator
        run: |
          # Assumes Android SDK and AVD are pre-configured
          $ANDROID_HOME/emulator/emulator -avd test_avd -no-window -gpu swiftshader_indirect &
          adb wait-for-device
          adb shell input keyevent 82  # Unlock screen

      - name: Build APK
        run: ./gradlew assembleDebug

      - name: Run Maestro Tests
        run: maestro test .maestro/
iOS on macOS
For iOS simulator testing, you need a macOS machine.
# .github/workflows/maestro-ios.yaml
name: Maestro iOS (Self-Hosted)

on: [push, pull_request]

jobs:
  test:
    runs-on: self-hosted  # macOS with Xcode installed
    steps:
      - uses: actions/checkout@v4

      - name: Install Maestro
        run: |
          curl -Ls "https://get.maestro.mobile.dev" | bash
          echo "$HOME/.maestro/bin" >> $GITHUB_PATH

      - name: Install idb-companion
        run: |
          brew tap facebook/fb
          brew install facebook/fb/idb-companion

      - name: Start iOS Simulator
        run: |
          DEVICE_ID=$(xcrun simctl list devices available --json | \
            jq -r '.devices[] | .[] | select(.name == "iPhone 15") | .udid' | head -n 1)
          xcrun simctl boot "$DEVICE_ID"
          sleep 30  # Wait for simulator to boot

      - name: Build App
        run: |
          xcodebuild -project MyApp.xcodeproj \
            -scheme MyApp \
            -destination 'platform=iOS Simulator,name=iPhone 15' \
            -derivedDataPath build

      - name: Run Maestro Tests
        run: maestro test .maestro/
Third-Party Runners
Don’t want to manage your own hardware? Services like BuildJet offer Linux runners with KVM at lower cost than GitHub’s macOS runners.
jobs:
  test:
    runs-on: buildjet-2vcpu-ubuntu-2204  # KVM-enabled runner
Option 3: Jenkins with Local Devices
Jenkins gives you the most control. You manage everything: the server, the agents, the devices.
Basic Jenkinsfile
pipeline {
    agent {
        label 'android'  // Agent with Android SDK and connected device
    }

    stages {
        stage('Checkout') {
            steps {
                git 'https://github.com/your/repo.git'
            }
        }

        stage('Install Maestro') {
            steps {
                sh '''
                    curl -Ls "https://get.maestro.mobile.dev" | bash
                    export PATH="$HOME/.maestro/bin:$PATH"
                    maestro --version
                '''
            }
        }

        stage('Build') {
            steps {
                sh './gradlew assembleDebug'
            }
        }

        stage('Start Emulator') {
            steps {
                sh '''
                    $ANDROID_HOME/emulator/emulator -avd test_avd -no-window &
                    adb wait-for-device
                    adb shell input keyevent 82
                '''
            }
        }

        stage('Run Maestro Tests') {
            steps {
                sh '''
                    export PATH="$HOME/.maestro/bin:$PATH"
                    maestro test .maestro/ --format junit --output test-results.xml
                '''
            }
        }
    }

    post {
        always {
            junit 'test-results.xml'
            sh 'adb emu kill || true'
        }
    }
}
Physical Devices with Jenkins
For physical devices, connect them to your Jenkins agent via USB:
stage('Run on Physical Device') {
    steps {
        sh '''
            # List connected devices
            adb devices

            # Install app
            adb install -r app/build/outputs/apk/debug/app-debug.apk

            # Run Maestro
            maestro test .maestro/
        '''
    }
}
Parallel Execution with Sharding
Maestro 2.0 introduced sharding for parallel test execution:
stage('Run Parallel Tests') {
    steps {
        sh '''
            # With 3 connected devices, split tests across all of them
            maestro test .maestro/ --shard-split 3
        '''
    }
}
The --shard-split flag distributes your test flows across N devices. Each device runs a subset of the tests.
The Problem with Self-Hosting
All three DIY options share the same fundamental issue: you manage the infrastructure.
That means:
- Keeping emulators/simulators updated
- Managing device connections (USB hubs, network ADB)
- Handling device failures and reboots
- Maintaining Maestro CLI versions
- Dealing with flaky emulators in CI
For Android, emulators in CI are notoriously unreliable. Google’s own guidance recommends using real devices for stable E2E tests.
For iOS, you can’t run Maestro on physical devices at all—not with the open-source version. Maestro only supports iOS simulators. If you need real iPhone testing, you’re back to paying BrowserStack (who runs an outdated fork) or Maestro Cloud. For reporting, see Maestro Test Reports: JUnit, HTML, Allure.
Option 4: Your Own Devices, Managed Infrastructure
What if you could get cloud-like simplicity with self-hosted economics?
That’s what we built DeviceLab to solve.
How It Works
- Connect your own physical devices (Android + iOS)
- DeviceLab runs Maestro tests on them via peer-to-peer WebRTC
- Your app binary and test data never leave your network
# .github/workflows/devicelab-maestro.yaml
name: Maestro on DeviceLab

on: [push, pull_request]

jobs:
  test:
    runs-on: ubuntu-latest
    steps:
      - uses: actions/checkout@v4

      - name: Build APK
        run: ./gradlew assembleDebug

      - name: Run on DeviceLab
        run: |
          curl -fsSL https://app.devicelab.dev/test-node/${{ secrets.DEVICELAB_KEY }} | sh -s -- \
            --framework maestro \
            --platform android \
            --app ./app/build/outputs/apk/debug/app-debug.apk \
            --tests ./.maestro/
What’s Different
| Maestro Cloud | Self-Hosted | DeviceLab | |
|---|---|---|---|
| Infrastructure | Theirs | Yours (all of it) | Yours (devices only) |
| Devices | Theirs | Yours | Yours |
| Maestro version | Latest | You manage | Latest |
| iOS physical devices | No | No | Yes |
| Setup time | Minutes | Hours/days | Minutes |
| Monthly cost | $250/device | $0 + your time | $99/device (1st free) |
The key difference: DeviceLab runs the latest open-source Maestro on your devices. No outdated forks. No version lag.
And unlike any cloud solution: Maestro works on real iOS physical devices, not just simulators.
Choosing Your Path
Use Maestro Cloud if:
- Budget isn’t a constraint
- You don’t own devices
- You want zero infrastructure management
- SOC 2 compliance is required
Use self-hosted runners if:
- You have DevOps capacity to maintain infrastructure
- You only need Android (emulators are easier than iOS)
- Budget is tight and time is available
Use Jenkins with devices if:
- You already have Jenkins infrastructure
- You have physical devices available
- You want complete control over the environment
Use DeviceLab if:
- You own or can buy the devices
- You need iOS physical device testing (not simulators)
- You want the latest Maestro without managing infrastructure
- You want predictable costs without per-minute billing
For a full framework comparison, see Maestro vs Appium 2025.
Sample Flows for Any CI
Whichever CI you choose, your Maestro flows stay the same:
# .maestro/login.yaml
appId: com.example.app
---
- launchApp
- tapOn: "Sign In"
- tapOn: "Email"
- inputText: "[email protected]"
- tapOn: "Password"
- inputText: "password123"
- tapOn: "Submit"
- assertVisible: "Welcome"
# .maestro/checkout.yaml
appId: com.example.app
---
- launchApp
- tapOn: "Products"
- tapOn: "Add to Cart"
- tapOn: "Cart"
- tapOn: "Checkout"
- assertVisible: "Order Confirmed"
The flows are portable. The execution environment is what changes.
The Bottom Line
Maestro is free. Running Maestro at scale is where costs appear.
You have options:
- Pay Maestro Cloud for managed simplicity ($250/device/month)
- Self-host everything for free (but spend engineering time)
- Use your devices with DeviceLab for a middle path ($99/device/month, 1st free)
The right choice depends on your budget, your team’s DevOps capacity, and whether you need real iOS devices.
Need Maestro CI/CD on your own devices? DeviceLab runs the latest Maestro on your physical iOS and Android devices—no uploads, no third-party data access. Start free.