
Your Maestro flows work. Clean YAML, reliable tests, runs perfectly on your local device.
Then you tried to run them on BrowserStack.
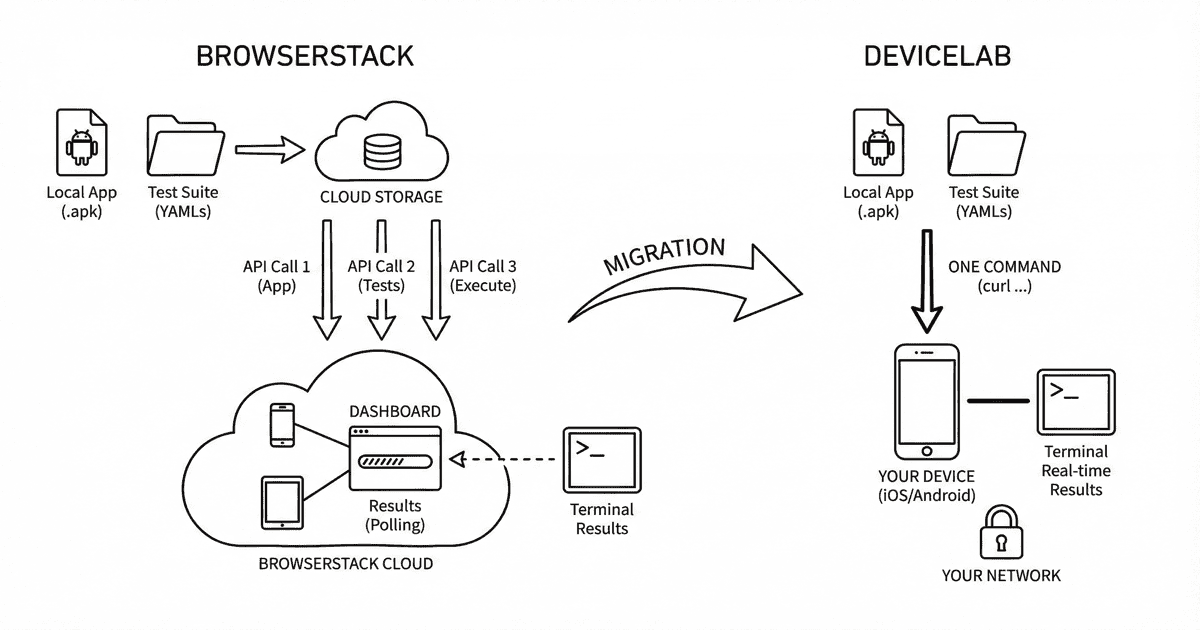
Suddenly you’re uploading apps via REST API, zipping test suites with specific folder structures, making multiple API calls, and tracking build IDs. What was maestro test flow.yaml became a multi-step orchestration.
Here’s how to get back to simplicity.
What BrowserStack Made You Do
Step 1: Upload Your App
curl -u "YOUR_USERNAME:YOUR_ACCESS_KEY" \
  -X POST "https://api-cloud.browserstack.com/app-automate/maestro/v2/app" \
  -F "file=@/path/to/app.apk" \
  -F "custom_id=SampleApp"
Response:
{
  "app_name": "app.apk",
  "app_url": "bs://c8ddcb5649a8280ca800075bfd8f151115bba6b3",
  "app_id": "c8ddcb5649a8280ca800075bfd8f151115bba6b3",
  "uploaded_at": "2025-01-05 14:52:54 UTC",
  "custom_id": "SampleApp",
  "expiry": "2025-02-05 14:52:54 UTC"
}
Note that app_url. You’ll need it.
Step 2: Zip Your Test Suite (Correctly)
BrowserStack requires a specific folder structure:
sample_parent_folder/           ← Must have a parent folder
├── flow1.yaml                  ← Root flows run by default
├── flow2.yaml
├── common/
│   └── login.yaml              ← Won't run unless specified
└── subflows/
    └── checkout.yaml
Critical: If you upload a .zip without a parent folder, tests fail.
# Wrong (will fail)
zip -r tests.zip *.yaml

# Right
mkdir test_suite
cp -r *.yaml common/ subflows/ test_suite/
zip -r tests.zip test_suite
Then upload:
curl -u "YOUR_USERNAME:YOUR_ACCESS_KEY" \
  -X POST "https://api-cloud.browserstack.com/app-automate/maestro/v2/test-suite" \
  -F "[email protected]" \
  -F "custom_id=SampleTest"
Response:
{
  "test_suite_name": "tests.zip",
  "test_suite_url": "bs://89c874f21852ba57957a3fdc33f47514288c4ba1",
  "test_suite_id": "89c874f21852ba57957a3fdc33f47514288c4ba1",
  "custom_id": "SampleTest",
  "expiry": "2025-02-05 15:35:00 UTC"
}
Note that test_suite_url too.
Step 3: Execute the Build
curl -u "YOUR_USERNAME:YOUR_ACCESS_KEY" \
  -X POST "https://api-cloud.browserstack.com/app-automate/maestro/v2/android/build" \
  -H "Content-Type: application/json" \
  -d '{
    "app": "bs://c8ddcb5649a8280ca800075bfd8f151115bba6b3",
    "testSuite": "bs://89c874f21852ba57957a3fdc33f47514288c4ba1",
    "project": "My_Project",
    "devices": ["Samsung Galaxy S23-13.0", "Google Pixel 8-14.0"],
    "networkLogs": "true",
    "deviceLogs": "true"
  }'
Response:
{
  "message": "Success",
  "build_id": "5c5ab4338cec13aeb78f7a6977344556ac00bccd6"
}
Now track that build_id to see results.
Step 4: Check Results
Poll the API or check the dashboard.
Total API calls: 3 minimum (upload app, upload tests, execute)
Files modified: Your YAML? None. Everything else around it? Everything.
What DeviceLab Requires
Your Flows
Same YAML. No changes.
# login_flow.yaml
appId: com.example.myapp
---
- launchApp
- tapOn: "Sign In"
- tapOn: "Email"
- inputText: "[email protected]"
- tapOn: "Password"
- inputText: "password123"
- tapOn: "Login"
- assertVisible: "Welcome"
Running Tests
curl -fsSL https://app.devicelab.dev/test-node/KEY | sh -s -- \
  --framework maestro \
  --app ./app.apk \
  --tests ./flows/
That’s it. One command. Same YAML files. No uploads. No zipping. No build IDs.
Side-by-Side Comparison
The Workflow
| Step | BrowserStack | DeviceLab |
|---|---|---|
| Upload app | REST API call → get bs:// URL | Included in command |
| Upload tests | Zip correctly → REST API call | Included in command |
| Execute | REST API call with both URLs | Same command |
| Track results | Poll API / dashboard | CLI output |
| Total API calls | 3 | 0 |
Your Files
| BrowserStack | DeviceLab | |
|---|---|---|
| YAML flows | No changes | No changes |
| Folder structure | Must have parent folder | Use as-is |
| Zip file | Required | Not needed |
| Build scripts | Multi-step orchestration | One command |
Configuration
| BrowserStack | DeviceLab | |
|---|---|---|
| Credentials | Username + Access Key | Org Key |
| App reference | bs:// hash (expires in 30 days) |
Local file path |
| Test reference | bs:// hash |
Local directory |
| Device selection | JSON in API call | CLI flag |
The Migration
Step 1: Remove BrowserStack Scripts
If you have CI/CD scripts like this:
#!/bin/bash
# upload_and_run.sh

# Upload app
APP_URL=$(curl -u "$BS_USER:$BS_KEY" \
  -X POST "https://api-cloud.browserstack.com/app-automate/maestro/v2/app" \
  -F "file=@$APK_PATH" | jq -r '.app_url')

# Zip tests
mkdir -p test_suite
cp -r flows/* test_suite/
zip -r tests.zip test_suite

# Upload tests
TEST_URL=$(curl -u "$BS_USER:$BS_KEY" \
  -X POST "https://api-cloud.browserstack.com/app-automate/maestro/v2/test-suite" \
  -F "[email protected]" | jq -r '.test_suite_url')

# Execute
curl -u "$BS_USER:$BS_KEY" \
  -X POST "https://api-cloud.browserstack.com/app-automate/maestro/v2/android/build" \
  -H "Content-Type: application/json" \
  -d "{
    \"app\": \"$APP_URL\",
    \"testSuite\": \"$TEST_URL\",
    \"devices\": [\"Samsung Galaxy S23-13.0\"]
  }"

# Cleanup
rm -rf test_suite tests.zip
Delete it.
Step 2: Replace With One Command
curl -fsSL https://app.devicelab.dev/test-node/KEY | sh -s -- \
  --framework maestro \
  --app ./app.apk \
  --tests ./flows/
Step 3: Update CI/CD
Before (GitHub Actions with BrowserStack):
name: Maestro Tests
on: [push]

jobs:
  test:
    runs-on: ubuntu-latest
    steps:
      - uses: actions/checkout@v4

      - name: Upload App to BrowserStack
        id: upload-app
        run: |
          RESPONSE=$(curl -u "${{ secrets.BS_USER }}:${{ secrets.BS_KEY }}" \
            -X POST "https://api-cloud.browserstack.com/app-automate/maestro/v2/app" \
            -F "[email protected]")
          APP_URL=$(echo $RESPONSE | jq -r '.app_url')
          echo "app_url=$APP_URL" >> $GITHUB_OUTPUT

      - name: Prepare Test Suite
        run: |
          mkdir -p test_suite
          cp -r flows/* test_suite/
          zip -r tests.zip test_suite

      - name: Upload Tests to BrowserStack
        id: upload-tests
        run: |
          RESPONSE=$(curl -u "${{ secrets.BS_USER }}:${{ secrets.BS_KEY }}" \
            -X POST "https://api-cloud.browserstack.com/app-automate/maestro/v2/test-suite" \
            -F "[email protected]")
          TEST_URL=$(echo $RESPONSE | jq -r '.test_suite_url')
          echo "test_url=$TEST_URL" >> $GITHUB_OUTPUT

      - name: Run Tests
        run: |
          curl -u "${{ secrets.BS_USER }}:${{ secrets.BS_KEY }}" \
            -X POST "https://api-cloud.browserstack.com/app-automate/maestro/v2/android/build" \
            -H "Content-Type: application/json" \
            -d '{
              "app": "${{ steps.upload-app.outputs.app_url }}",
              "testSuite": "${{ steps.upload-tests.outputs.test_url }}",
              "devices": ["Samsung Galaxy S23-13.0"]
            }'
After (GitHub Actions with DeviceLab):
name: Maestro Tests
on: [push]

jobs:
  test:
    runs-on: ubuntu-latest
    steps:
      - uses: actions/checkout@v4

      - name: Run Tests
        run: |
          curl -fsSL https://app.devicelab.dev/test-node/${{ secrets.DEVICELAB_ORG_KEY }} | sh -s -- \
            --framework maestro \
            --app ./app.apk \
            --tests ./flows/
Lines of YAML:
- BrowserStack: 45 lines
- DeviceLab: 15 lines
What You Gain
1. No More “Works Locally, Fails in Cloud” Debugging
For tunnel-specific issues, see BrowserStack Local Keeps Dropping? 2025 Fix. For Maestro version limitations, see our version gap analysis.
This is where teams lose the most time with cloud testing services.
The BrowserStack reality:
- Your staging environment is behind a firewall
- You need to open firewall rules to BrowserStack IPs (security risk)
- Or configure BrowserStack Local tunnel
- Tunnel drops mid-test, causing random failures
- DNS resolution works differently in their cloud
- SSL certificates fail for internal services
Result: Teams spend more time debugging environment issues than actual test failures. The test isn’t flaky—the connection to your staging API is.
The DeviceLab reality:
Your devices sit on your network. They already have access to your staging servers, internal APIs, VPNs, and test databases. Same access as your laptop.
- No firewall changes
- No tunnels to configure or maintain
- No “works on my machine” debugging
- Same network, same DNS, same access
If your test works locally, it works on DeviceLab.
2. No Upload Dance
BrowserStack: Every build requires uploading app → uploading tests → executing. App URLs expire in 30 days.
DeviceLab: Pass the file path. Done.
3. No Zip Structure Anxiety
BrowserStack’s docs warn:
“Incorrect folder structure may cause Maestro to fail in locating your flow files, resulting in test execution failures.”
DeviceLab: Point to your flows directory. It works.
# Your actual folder structure
flows/
├── login.yaml
├── checkout.yaml
└── profile/
    └── update.yaml

# DeviceLab command
curl ... --tests ./flows/
4. iOS Physical Device Support
Maestro officially supports:
- Android devices
- Android emulators
- iOS simulators
- ❌ iOS physical devices
BrowserStack: Uses their own closed-source fork of Maestro. Last checked, it was based on version 1.39—the current open-source version is 2.0.10. You’re locked into whatever version they decide to ship. See BrowserStack Maestro setup guide for more details. Also check BrowserStack pricing to understand the costs.
DeviceLab: You choose your Maestro version. Run the latest 2.x release, or pin to a specific version for consistency. Plus, DeviceLab runs Maestro on your physical iOS devices.
curl -fsSL https://app.devicelab.dev/test-node/KEY | sh -s -- \
  --framework maestro \
  --platform ios \
  --app ./MyApp.ipa \
  --tests ./flows/ \
  --device-names "John's iPhone 15"
This is something BrowserStack can’t offer because Maestro itself doesn’t support iOS physical devices. DeviceLab has custom iOS device support that makes this possible.
5. Your Data Never Leaves
BrowserStack flow:
Your APK → Their servers (uploaded)
Your YAML → Their servers (uploaded)
Test execution → Their devices
Results → Their dashboard
DeviceLab flow:
Your APK → Your device (P2P transfer)
Your YAML → Your device (P2P transfer)
Test execution → Your device
Results → Your machine
DeviceLab never sees your app, your flows, or your test results.
6. Faster Iteration
BrowserStack:
- Make a change to flow.yaml
- Re-zip the test suite
- Upload new test suite
- Execute build
- Wait for results
DeviceLab:
- Make a change to flow.yaml
- Run command
- See results
No re-uploading. No waiting for processing. Your changes run immediately.
Device Selection
BrowserStack:
{
  "devices": ["Samsung Galaxy S23-13.0", "Google Pixel 8-14.0"]
}
Device selection is embedded in the API call.
DeviceLab:
# Specific device
curl ... --device-names "Samsung Galaxy S23"

# Multiple devices (parallel)
curl ... --device-count 3

# Specific OS version
curl ... --os-version "14"

# Any available
curl ...
Device selection is a CLI flag. Your test code stays clean.
Parallel Execution
BrowserStack:
{
  "devices": [
    "Samsung Galaxy S23-13.0",
    "Google Pixel 8-14.0",
    "OnePlus 11-13.0"
  ]
}
DeviceLab:
curl ... --device-count 3
Same result. DeviceLab distributes flows across available devices automatically.
Common Migration Issues
“I use execute parameter to run specific flows”
BrowserStack:
{
  "execute": ["path/to/flow1.yaml", "path/to/flow2.yaml"]
}
DeviceLab:
# Run specific flows
curl ... --tests ./flows/flow1.yaml

# Run a directory
curl ... --tests ./flows/smoke/

# Run multiple
curl ... --tests ./flows/login.yaml --tests ./flows/checkout.yaml
“I need network and device logs”
DeviceLab captures logs locally by default. You can optionally enable cloud storage in settings, but no logs are uploaded unless you choose to.
“My flows use environment variables”
Both support them:
BrowserStack (via config.yaml):
env:
  USERNAME: [email protected]
  API_KEY: 12345
DeviceLab:
curl ... --env [email protected] --env API_KEY=12345
Or use a .env file:
curl ... --env-file .env
“What if a flow fails?”
DeviceLab shows real-time output in your terminal. No dashboard polling needed.
✅ login.yaml - PASSED (12.3s)
❌ checkout.yaml - FAILED (8.1s)
   └── assertVisible "Order Confirmed" failed
✅ profile.yaml - PASSED (6.2s)

Results: 2/3 passed
Migration Checklist
| Step | Action |
|---|---|
| 1 | Delete BrowserStack upload scripts |
| 2 | Remove zip/folder structure handling |
| 3 | Update CI/CD to single DeviceLab command |
| 4 | Connect your devices with device node |
| 5 | Run curl ... --framework maestro |
Total time: 15 minutes
Set Up Your Devices (Once)
Before running tests, connect your devices to DeviceLab:
# On the machine with your devices
curl -fsSL https://app.devicelab.dev/device-node/KEY | sh
For iOS physical devices (yes, Maestro on real iPhones):
curl -fsSL https://app.devicelab.dev/device-node/KEY | sh -s -- \
  --apple-team-id YOUR_TEAM_ID
Devices appear in your dashboard. They’re now available for Maestro testing from anywhere.
Summary
| BrowserStack | DeviceLab | |
|---|---|---|
| API calls | 3 (upload app, upload tests, execute) | 0 |
| Zip handling | Required, specific structure | Not needed |
| App reference | bs:// hash (expires) |
Local path |
| YAML changes | None | None |
| Maestro version | Closed fork (1.39) | You choose (latest 2.x) |
| iOS physical | No | Yes |
| Your data | On their servers | Never leaves your network |
Local to DeviceLab: Zero Changes
Local Maestro:
maestro test flow.yaml
DeviceLab Maestro:
curl -fsSL https://app.devicelab.dev/test-node/KEY | sh -s -- \
  --framework maestro \
  --app ./app.apk \
  --tests ./flows/
Same YAML. Different device. Your network.
Next Steps
- Set up device node: Connect your devices
- Run your first Maestro test: Maestro testing guide
- Try iOS physical devices: iOS Maestro support
- Migrate Appium tests? See Migrate from BrowserStack: Appium Guide
Frequently Asked Questions
How do I run specific Maestro flows with DeviceLab?
Use the --tests flag with specific flow paths: curl ... --tests ./flows/flow1.yaml or for a directory: curl ... --tests ./flows/smoke/.
Does DeviceLab support Maestro environment variables?
Yes. Use --env flags for individual variables or --env-file for a .env file.
Can I run Maestro on iOS physical devices with DeviceLab?
Yes. DeviceLab has custom iOS device support that enables Maestro on real iPhones, which BrowserStack and Maestro officially don’t support — see our maestro-runner project for details.
What happens when a Maestro flow fails on DeviceLab?
DeviceLab shows real-time output in your terminal with pass/fail status for each flow. No dashboard polling needed.
Questions?
Talk to us or check out the documentation.
Your Maestro flows already work. Stop orchestrating around someone else’s infrastructure.